Ideal addition for your ticket system
A ticket system is the ideal solution for your support or helpdesk. You can collect, channel and efficiently process incoming customer requests. The ticket system automatically assigns an ID to each incoming request, which is used for all processes related to the request. This is a simple way to collect all internal and external communication about a customer concern in one place. Via the ticket, you quickly get an overview of …
- what the issue is,
- which employee is currently dealing with it
- and the status of the ticket.
Sometimes, however, customers do not contact the company’s e-mail address, but your personal e-mail address. In this case, the customer’s concern does not end up in the ticket system, but in your personal mailbox. Of course, you can continue working with it from there, but handling support requests in mail clients like Microsoft Outlook is cumbersome.
You quickly lose track of which mails or tasks are currently pending and by when they have to be completed. This is where conventional mail programs reach their limits. A better solution would be one that allows you to transfer personal messages quickly and easily into your ticket system.
Convert Outlook mails into projectfacts tickets
We may present: Our new Outlook add-in for ticket import. With it you forward mails from your Outlook mailbox to the projectfacts ticket system with a few clicks. This way no message will be lost anymore and you will benefit from a complete documentation in the projectfacts ticket system.
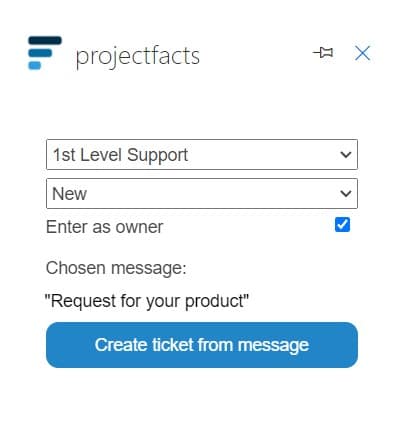
Simply add the projectfacts add-in to your Outlook mailbox. This works with your local mail program as well as with the Outlook web client. Select any mail and convert it into a projectfacts ticket via the add-in’s task pane. You have several choices when creating a ticket:
- Ticket channel: Use the upper dropdown field to select the ticket channel to which the mail should be transferred. In our case, we select the Support channel, since it is a customer request.
- Ticket status: With the lower dropdown field you define the status the ticket should get in projectfacts. By default, the first status that is intended for the workflow of the respective ticket channel is set automatically. However, you can also set the status manually, e.g. to “Done” if you have already answered a mail and want to file it for documentation purposes only.
- Enter as owner: With this checkbox, you can automatically register yourself as the owner of the ticket. It is activated by default. If you uncheck the box, no owner will be added to the ticket at first.
By clicking on “Create ticket from message”, you will automatically create a ticket from the selected mail. The ticket receives an ID and can be processed further in projectfacts.
Track ticket status in Outlook
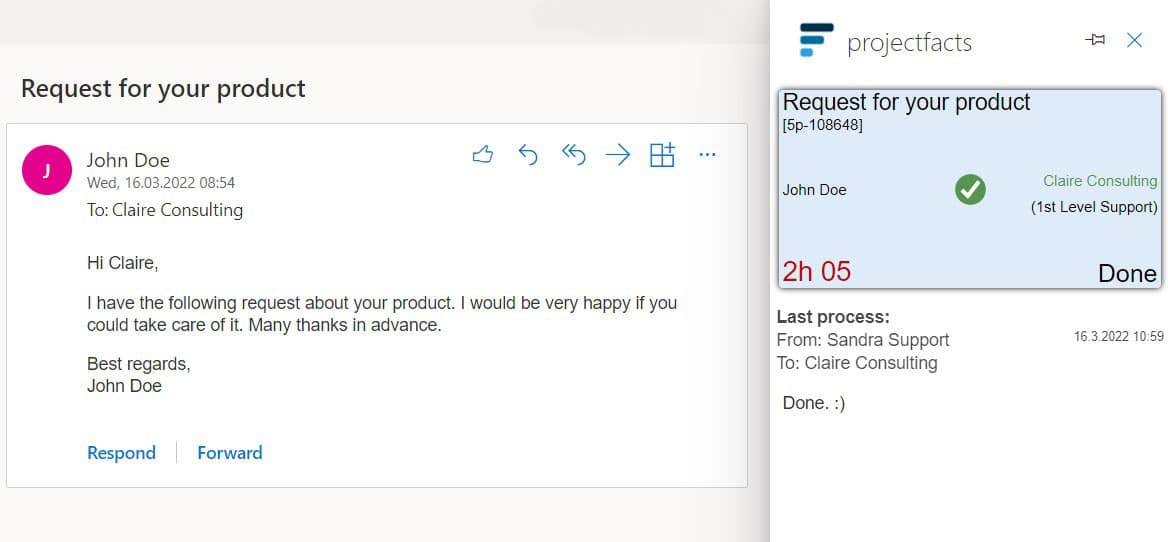
With the projectfacts Ticket Add-in you can not only create new tickets, but also track the status of the tickets in Outlook. To do this, simply select a mail that you have already converted into a ticket.
On the task pane you will now see a ticket preview card as you are already used to from projectfacts. The card shows you all important information at a glance.
- The title of the mail and the ID that was assigned to the mail in projectfacts.
- The team member who is currently working on the ticket (Claire Consulting).
- If available, the person responsible for the ticket.
- The channel the ticket is currently in (1st Level Support).
- The elapsed time since the ticket was received (2h 05).
- The current status of the ticket (Done).
Below the preview card you can also see the last process within the ticket including the timestamp. With this information, you can keep track of your tickets in Outlook at any time.
Setting up the Outlook add-in
Please note:
The Outlook Add-in is currently being certified by Microsoft before it is released for use. This process may take some time. As soon as the certification is finished, you will find out here.
For the Outlook Add-in you need a valid projectfacts license, a minimum version which you can find in the add-in description, a Microsoft Exchange account and an Office 365 license. In individual cases, further requirements may also be necessary. In case of doubt, please feel free to contact our consulting team.
Call up the add-ins via Microsoft Outlook. In the desktop client, you will find a button for this in the menu ribbon. Use the search function and enter “projectfacts”. The projectfacts add-in for Outlook will be listed in the overview. Click on it and then on “Add”.
You will now find the projectfacts add-in in the Outlook menu ribbon. If you click on it, you will get to the setup dialog. Here you will be asked for your access data for projectfacts. Please contact our support for further setup. After confirmation the add-in is ready for use.
Further questions about the Outlook Add-in
You are interested in our add-in, have questions or need help with the setup? Then please contact us, we are ready to help you.
If you don’t use projectfacts yet but would like to try it out, sign up for a free and non-binding trial version.
Header image: © natanaelginting – freepik.com (2022)


